

In parts one and two, we covered the basics of the energy cycles, trophic levels, and the inputs and outputs of a partially self-sustaining aquatic ecosystem within your planted aquarium. In part three, I’ll detail how to set up your very own self-sustaining planted tank. I will list all the necessary equipment and I will describe the part played by each one in creating self-sustainability.
Light
One of the most important aspects of a self-sustaining planted tank is the quality and quantity of lighting. Light is directly responsible for the health of your plants, and consequently, for the success of your setup. Healthy plants create healthy planted aquariums.
Today’s standard for freshwater planted lighting is LED. LED fixtures are inexpensive, long-lived, energy efficient, low heat, and capable of emitting a wide spread of light. In addition, LEDs are highly programmable, which is necessary for self-sustaining planted tanks.
Choosing the right fixture depends on your aquarium’s needs and your budget. The most expensive lights for planted tanks are second-to-none and are often set up along with top of the line CO2 reactors, high-grade soil substrates, and plants which require a PAR level above 200 PPF (photosynthetic photon flux). However, regardless of the size of your budget, your lighting should accomplish three things; (1) intensity, (2) wavelength, and (3) customization.
In part two, I discussed Photosynthetically Active Radiation (PAR) as it relates to light intensity. You should choose a light fixture which matches the intensity requirements of the plants you intend to have. Low light plants only need 75 - 100 PPF, while high intensity plants require above 200 PPF. Don’t forget, PAR values drop the further your plants are from the fixture. Your light may put out 200 PPF at 6 inches below the fixture, but that number will be significantly reduced at 12, 24, and 36 inches as it is refracted below the surface of the water.
The second component to consider when choosing a light source is wavelength. A full spectrum fixture is a good place to start. These fixtures put out “daylight” and include light along the entire visible spectrum from 400 to 700 nm. Next, consider a fixture that has extra diodes in the 550 to 700 nm range. Light within this range is most efficient for photosynthesis, and therefore beneficial to the growth of your plants.
In addition to wavelength, also consider the temperature of the light. Temperature, in this case, refers to the color the fixture emits. White daylight is around 4,500 Kelvin (K), warm, yellow light is around 3,000K and cool, blue light is around 6,000k. If your fixture has extra color diodes in the 550 to 700 nm range, those will also affect how the color of your plants is perceived.
Lastly, the level of customization a fixture offers is important to review. More expensive fixtures can adjust intensity and wavelength (temperature) either manually, or through an app or an attached controller. My planted tank lights have a fixed temperature I am happy with, and I attached a programmable dimmer to them to automatically adjust the light intensity throughout the day. There are many combinations of customization, so make sure your fixture can accommodate your needs.
Installing the light
So you have chosen a fixture which: is bright enough, and produces the correct wavelength(s) or temperature of light, and has your necessary customization options. Now it's time to install it. Most fixtures will have some kind of mounting bracket or mechanism which attaches to the top of the sides of your tank. The light then sits either a few, or several, inches above the top of the tank. Some mounting brackets are fixed and don’t move, others are more “gooseneck” in nature and can allow the light to be moved around to the perfect angle.

Another option for mounting your light is to hang it from a tall frame mounted on the tank or from brackets in the ceiling above the tank. This hanging setup allows you to adjust the height of the fixture, and therefore its spread and intensity. This method is most useful for long panel fixtures. Fixtures which are attached to gooseneck mounts can be adjusted easily by bending the mount itself.
Programming the Light for Sustainability.
Once the light is installed, it's time to program it. If your light only has a timer, and is always at full intensity when it is on, be sure it is mounted high enough from the tank, and set the timer for around nine hours. As your tank develops, you can adjust the height of the light and the amount of time it's on each day. Eventually, you will determine the spot where you have optimal plant growth and no excessive algae.
Alternatively, if your fixture only has a timer, or no adjustment features at all, I strongly recommend a programmable dimmer or at the very least, a timer. The programmable dimmer allows you to gradually increase the intensity of your light, from 0% to 100%, then back down to 0%, over several hours. This mimics the natural intensity of light from the sun, which reduces fish stress. This can prevent excess algae growth, while also maximizing the amount of time your light is on for you to enjoy your tank. I recommend the regimen below to begin with, then you can adjust as necessary.
Increment | Time | Intensity |
1 | 1100 | 0% |
2 | 1200 | 25% |
3 | 1400 | 50% |
4 | 1600 | 100% |
5 | 1800 | 75% |
6 | 1900 | 50% |
7 | 2000 | 25% |
8 | 2100 | 0% |
You can adjust the start and end time based on when you are around the tank the most.
More expensive lights will have apps which allow you to control wavelength (temperature/color), intensity, and duration as you see fit. The key is to be able to control these factors, how you accomplish this will depend on your budget, and the model of fixture you choose.
Experiment
The sun’s intensity and temperature have gone unchanged for billions of years, since earth’s atmosphere was formed, and all creatures on earth evolved within that constant light source. The key to self-sustainability in relation to lighting is consistency. However, this won’t be achieved overnight. You should change the intensity, temperature, and duration of your light until you find the combination that works for your tank. Then you can set it and forget it. The light will inundate your tank with all the energy necessary to constantly feed your self-sustaining cycles.
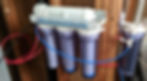
Filtration
With a self-sustaining planted aquarium, you should focus on two types of filtration: (1) biological, and (2) physical. While chemical filtration can be useful if you need to withdraw heavy metals or an ammonia spike, plants serve as the main source of chemical filtration in a self-sustaining system.

Whether you choose a hang-on-back, canister, or sump filter, the primary media of the filter should be biological. Fill most of the available space with highly porous media to accommodate nitrifying aerobic bacteria, and nitrogen-fixing anaerobic bacteria.
Mechanical filter pads, socks, or floss should be added before and after the biological media to prevent it from clogging, which would prevent oxygen from reaching the beneficial bacteria.
With the proper filtration setup, water from your tank should pass through mechanical filtration, which will remove excess detritus and particulate matter. Then, it will pass through the biological filtration media, where aerobic bacteria will convert ammonia to nitrite, then nitrite to nitrate; and anaerobic bacteria will convert nitrate to nitrogen. All of these steps are necessary for self-sustainability. While plants can help with preventing nitrate buildup, a diverse and solid bacterial community is vital for the biological success of your aquarium.
Substrate
The key to self-sustainability in terms of substrate, is to build a solid biological foundation which will feed your aquarium, and replenish itself over time. The components of this foundation are; (1) multiple strata, (2) well oxygenated, (3) natural, clay based soils, and (4) a heavy nutrient load.
Multiple Strata
In nature, aquatic environments exist atop multiple layers, or strata, of different sizes and types of substrate. The smallest, silt, mud, and soil, rest atop deposits of larger rock, which all exist above bedrock.
In the planted aquarium, multiple strata are important to allow proper oxygenation, to prevent soil from packing together too tightly, and to accommodate healthy root growth.
Bottom Layer
The bottom layer should consist of a large, porous rock. This layer of pumice-like substrate provides plenty of interstitial space for oxygen, where bacteria can grow. This prevents pockets of hydrogen sulfide gas from building up within the substrate. The spaces also gradually fill with nutrients which promote root growth, and provide places for roots to anchor themselves. This layer should be around 0.5 to 1 inch deep. Keep a border of a few centimeters between this layer and the outer glass panes of your tank. This will prevent the rocks from being seen after the top layers of substrate are added.

Dry Fertilizers
The bottom layer is also where you want to add dry fertilizers. There are dry, or powdered, fertilizers formulated for every major nutrient (nitrogen, phosphorus, potassium, iron), and minor trace element. There are also powdered fertilizer mixes, and beneficial bacterial colonies which you can add to your substrate.
While most soils (the next layer) will contain a lot of these organic nutrients, they will eventually be used up by your plants. Adding dry fertilizers ensures a solid biological foundation which your plants can thrive on for years.
Soil Layer
The second layer is a clay-based soil. A natural, clay-based soil is best, as it provides a soft substrate on which almost any aquatic plant will root. Most importantly, the clay in the soil will absorb every nutrient from the water column, and store it right next to growing plant roots for easy access.
On top of the soil layer, some aquarists will add an accent substrate or accent layer. Winding paths of bright sand against dark soil can look striking. Larger stones scattered around main focal rocks can provide visual harmony and counterbalance. While these accent layers don’t provide much in terms of a biological foundation, they can add aesthetic beauty to your whole tank.
Even with the porous rock layer, dry fertilizers, dry bacteria, and soil, your plants will use those nutrients up sooner or later. Adding wet fertilizers on a regular basis can replace many of the nutrients in the substrate, but wet fertilizers cannot completely replace soil nutrients, and they lack the advantage of proximity to plant roots. The soil will absorb some fertilizer from the water column, but not enough. For this reason, you can expect the nutrients in the substrate to decrease, and eventually deplete, over the course of several years.

In a self-sustaining planted aquarium, we can combat this depletion by adding wet fertilizers, and by allowing some detritus to fall, and decay within the substrate. The nutrient composition of your substrate will change over time, but replenishing it will maintain your partially self-sustainable setup.
Plants
The most crucial element of any self-sustaining aquarium is the plants. Live plants provide unparalleled chemical and biological filtration. Healthy plants will absorb phosphorus and nitrogen as they grow. Plants use energy (from light), and carbon (from CO2), to convert these chemicals into sugars or other compounds, which are used to build cells and new tissues within the plant. This plant matter is eventually either removed by trimming, or allowed to reenter the system as decaying detritus. This process prevents phosphorus, nitrogen, and nitrogen-based compounds like ammonia, ammonium, and nitrate from reaching toxic levels.
Types of Plants
There are many different ways to classify the different kinds of aquatic plants available to aquarium hobbyists.
One way is by their method(s) of nutrient uptake. Some species are very dependent on their roots for stability and uptake of nutrients. These plants require soil-based, layered substrate as I described above. Other plants are adept at absorbing nutrients from the water column and will even grow specialized aquatic roots along their stems to do so. Some plants, like java fern and Anubias, are rhizome plants. A rhizome is a specialized plant structure, much like a large root. These types of plants can root onto almost anything, including driftwood, rocks, or even other plants. Some mosses, like java moss and christmas moss, can grow easily anywhere in the water column when attached to décor. I even have a patch of monte carlo (Micranthemum) and Vallisneria dangling from a piece of driftwood in the middle of my 38 gallon planted tank.
Another method of sorting plants is by their growth habit. For example, certain plants are able to grow partially submerged underwater, and partially out of the water. These plants are often referred to as "emergent". In addition, some plants exhibit determinate growth, meaning they will grow only to a maximum height. However, many plants show indeterminate growth, meaning they will grow as large as light, nutrients, and other resources will allow. Considering the maximum potential size of your plants will help you decide where to place them within your tank in order to achieve your desired aesthetic.
Another classification of plants is their light requirement. Plants are adapted for somewhere within the range of (75-200 PPF). If you have installed a powerful enough light, you can have your pick of plants. However, if your light does not get bright enough to support high light plants at the bottom of your tank, you may be limited in your options. Moving high-light plants toward the top of the tank where they can receive more light will work, but only if the water column can provide a complete mix of nutrients to their exposed roots. Remember, you can usually dim the light if it is too bright, but you can’t make it brighter.
Choosing Plants
There are many different styles of aquascaping for your tank. Some designs are minimalist and only contain one or two species of plants, while others are eclectic, and may make use of dozens of different species. Regardless of the style you choose when designing your aquarium, the key to self-sustainability is to ensure that the plants within your tank can absorb nutrients at the rate at which they are being added to the tank. It is unlikely your plants won’t be able to keep up, provided they are healthy.
Carpeting plants are a great choice, as they have plenty of room for growth. They will readily absorb nutrients and provide a wonderful benthic (bottom) zone for your shrimp and fish.
It is a good idea to choose a faster growing background plant. With these species, you will have to trim more often. But they will absorb nutrients faster than other species, as well as providing an ideal background for your tank. These species should be planted behind other plants, toward the back of the tank.
Finally, your medium and foreground plants can either be fast or slow-growing. I like slower growing mid-ground plants so I can trim them to take shape over time and they are not constantly blocking light from the carpeting plants below them.
Livescaping
Now that you have chosen your aquatic plant species, it's time to acquire and plant them. You can order your plants online, or go to your local fish store. If you choose to purchase online, make sure the plants can be delivered without being exposed to extreme heat, or extreme cold, for too long. Also check online seller reviews, as some aquatic plant sellers have poor shipping practices. However, there are plenty of online suppliers that do it right every time, and are a great source for plants you can’t find locally.
If you can find specimens locally, make sure to briefly (30 mins) soak them in cold, chlorinated tap water, then in de-chlorinated tank water (30 min). This rinsing process ensures that the many kinds of microscopic algae which are clinging on your new plants will be less likely to transfer to your tank and begin to multiply. It will also kill any snail eggs if they are present. This process is necessary for locally sourced specimens, as local fish stores usually keep their live plants in aquariums with fish, snails and other species, under intense lighting. You may want to use this process with online sourced specimens as well.
Once your plants are ready to add to your tank, choose where you would like to place them, and begin splitting the plants up into individual stems. You’ll want to plant each individual stem into the soil a few centimeters apart from each other. Small plants will grow and fill in empty space, but overcrowding your plants at the start will cause some of them to die off and drop too much debris too quickly. They may also only grow up toward the light, and not spread out as desired.
For carpeting plants you might end up planting hundreds of individual stems over the entire substrate. It may seem tedious and look barren at first, but over several weeks the plants will fill in perfectly to create a full and luscious carpet.
You can add carpeting and mid-ground plants before you fill the tank with water. This makes them easier to plant. Spray down the soil with RODI water until it is wet most of the way through. Plant the individual stems half-way into the soil then cover the tank with shrink wrap and wait a couple of weeks for the plants to root. Once your plants have rooted, then you can slowly, drop by drop, fill the aquarium with water.
You can add taller, background plants after the tank is filled. Smaller plants can also be added after the tank is filled, but it is more difficult, because they are prone to escape from the soil and float to the top of the water.
CO2
In a self-sustaining tank, CO2 gas is just as important as light and nutrients. CO2 gas provides a source of carbon, which is necessary for plant tissue growth. Some carbon exists in the water column as a result of decaying organics, and gas exchange at the water surface. Neither of these carbon sources compare to the amount of readily available carbon which CO2 gas can provide.
Some plants don't require supplemented CO2 gas to grow, but nearly all plants will grow faster with it. This helps sustainability as faster growing plants pull more nutrients from the water.

After the tank is filled you can turn on your CO2 system. Check out this article to see what goes into a CO2 system.
The amount of CO2 being added to the tank is measured by a bubble counter, which is usually attached to the regulator. Each tank is different and requires a different amount of CO2. Due to differences in plant growth, two tanks may both be adding 2 bubbles/sec of CO2 gas, but the measurement of available CO2 gas in the water column may still be different. You can measure how much CO2 is in the water column using a drop checker. Increase or decrease the bubbles/sec on your regulator depending on the reading on your drop checker.
Most plants can only absorb CO2 when the lights are on. Make sure your CO2 is shut off at night and will only turn on 30 minutes after your light comes on, and 1 hour before it goes off. This process can be automated with a smart outlet or a manual timer outlet, along with a solenoid. Most CO2 regulators come with a solenoid attached. This article explains more.
Water
Water is the medium in which our self-sustainability cycles play out. It is within the water where nutrients are made available, where light photons interact with plants, where gasses are exchanged, and where living organisms breathe, eat, and die. This “soup” of elements, chemicals, and compounds is a chaotic mix of ever-changing chemistry.
The laws of physics and chemistry provide balance and order to this chaos, allowing us to parse out what exactly is happening in the tank, and therefore to control it. Self-sustainability is most successful when you know what your aquarium is composed of, what components are at play, and how they all affect each other.
The best way to do this is to start with a blank slate. You should know exactly what you're adding to your water and how much. This can only be accomplished if you start with the purest water possible, reverse osmosis deionized (RODI) water. This article explains the filtration process a little more, but essentially RODI water is exclusively composed of two hydrogen atoms to every one oxygen atom, that is, pure H2O.
Once you have pure water, then you can add the minerals, trace elements, metals, micronutrients, macronutrients, salts, and other compounds which you know your tank needs, and none of what it doesn’t.
Starting with tap water and then adding more chemicals to it only results in a set of reactions which you have no control over. The effects of these reactions are unknowable. Uncertain water chemistry is no way to start or maintain a successful self-sustaining planted tank.
When filling your tank for the first time, make sure your pure water has enough calcium carbonate added to ensure an alkalinity measure of 2 to 4 dKH. You should also add a re-mineralize solution so that the general hardness is between 1 and 3 dKH. Check out this article and read the section on soft water, to see what the water parameters should be for a soft-water planted tank. If you are setting up a hard water self-sustaining planted tank, adjust the alkalinity, general hardness, pH, and salts accordingly, as described in the linked article above.
Some re-mineralize solutions will include only calcium and magnesium to raise general hardness. Others will also include trace elements, salts, and minerals. I use and recommend the latter as it provides many elements necessary for plant growth. You should also be adding these trace elements, not including the calcium and magnesium, in the form of liquid fertilizers. These fertilizers should be added periodically over the life of the tank, but more on that in part four.
Part Four
At this point, you should have a tank with a layered, fertilized, soil-based substrate and plants sparsely planted and growing, with or without water. You have also chosen a timed, and preferably dimmable, high intensity and full visible spectrum light, a filter with plenty of biological filter media along with some physical media, and a CO2 gas system.
In part four, I’ll discuss what goes into maintaining your self-sustainable planted aquarium on a regular basis and over the lifetime of the tank. I’ll detail the use of liquid fertilizers and CO2, as well as plant trimming, automation, and a few final steps you can take to bring your system even closer to full self-sustainability.
Photos
Boodleshire LLC 2022
https://www.flickr.com/photos/30478819@N08/51038092886
https://creativecommons.org/licenses/by/2.0/